MONOKEY
 Charging
- Plug MONOKEY into a USB-C charger and let it fully charge before use.
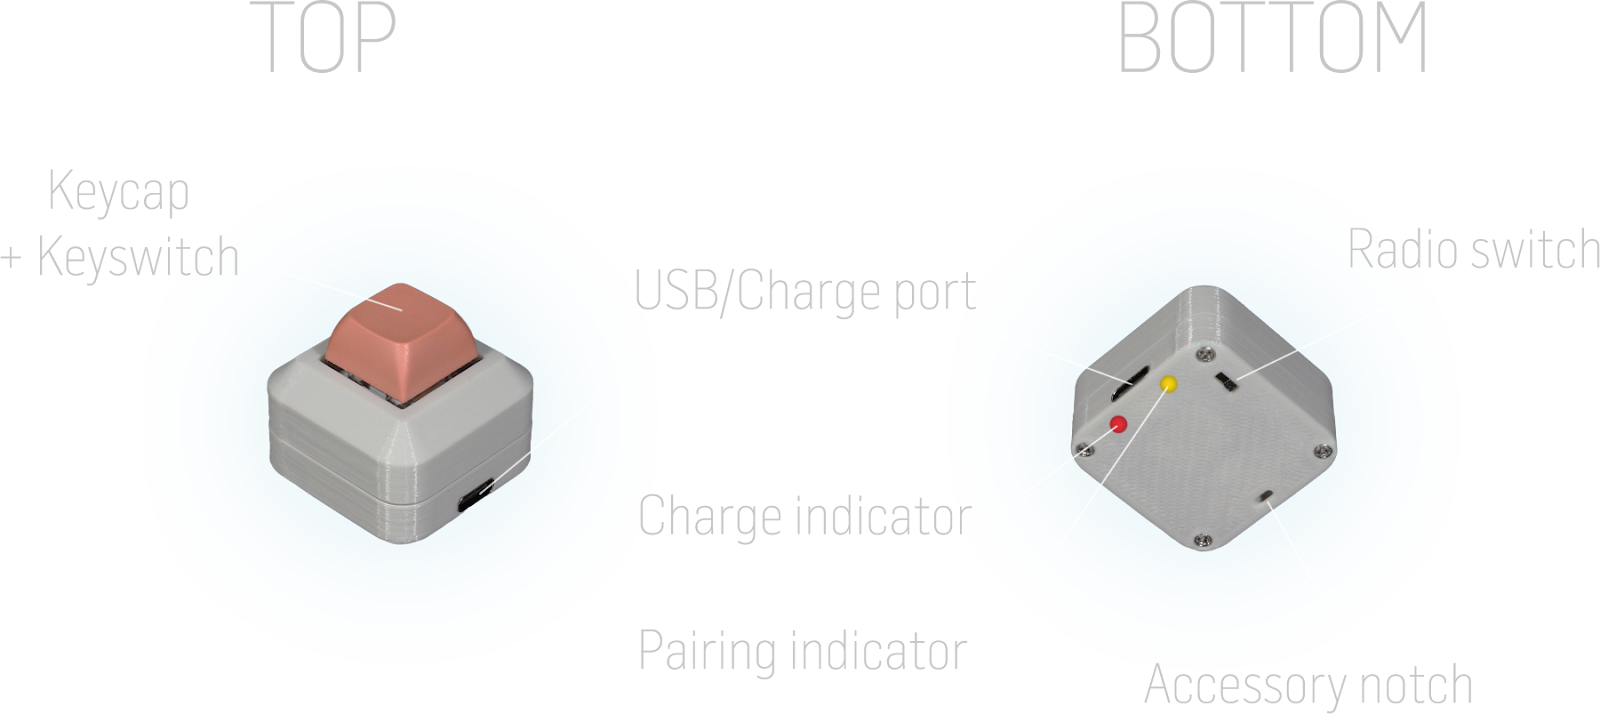
- While charging, the charge indicator (red LED) blinks.
- When fully charged, the charge indicator turns off.
 Bluetooth Pairing
- Flip the radio switch to the ON position to turn on MONOKEY.
- The pairing indicator (yellow LED) will blink while in pairing mode.
- Go to your device's Bluetooth settings, enable Bluetooth, and select "Add a device."
- MONOKEY will appear in the device list for pairing.
 MONOKEY Key Mapping
By default, MONOKEY is assigned to the letter K in the firmware. However, this key mapping can be customized using our official MONOKEY key mapping tool, FlashStation.
FlashStation
FlashStation is the official tool used to program MONOKEY. Access it at https://bigbadcult.github.io/flashstation.
Warning
FlashStation requires the WebSerial API to function. Please use a browser that supports WebSerial, such as Google Chrome, Microsoft Edge, or Opera.
A desktop or laptop computer is also required. FlashStation does not support iOS or Android devices.
Connecting to FlashStation
- Move the power switch on the MONOKEY to the OFF position.
- Plug the MONOKEY into the computer using a USB-C cable.
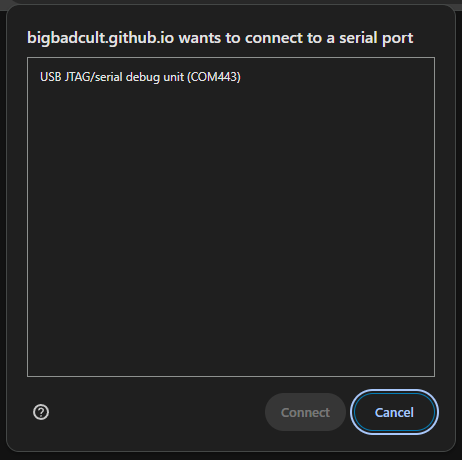
- Click on "Connect to MONOKEY" in FlashStation and verify that a pop-up appears prompting you to select a device.
- Move the power switch on the MONOKEY to the ON position.
- Wait for a device named "USB JTAG/serial debug unit" to appear and connect to it.
Info
The identifier (COM* on Windows, /dev/* on macOS and Linux) will differ between devices and
is not important.
Using FlashStation
Once connected, FlashStation displays the currently mapped key at the top, with a collection of selectable keys on the bottom.
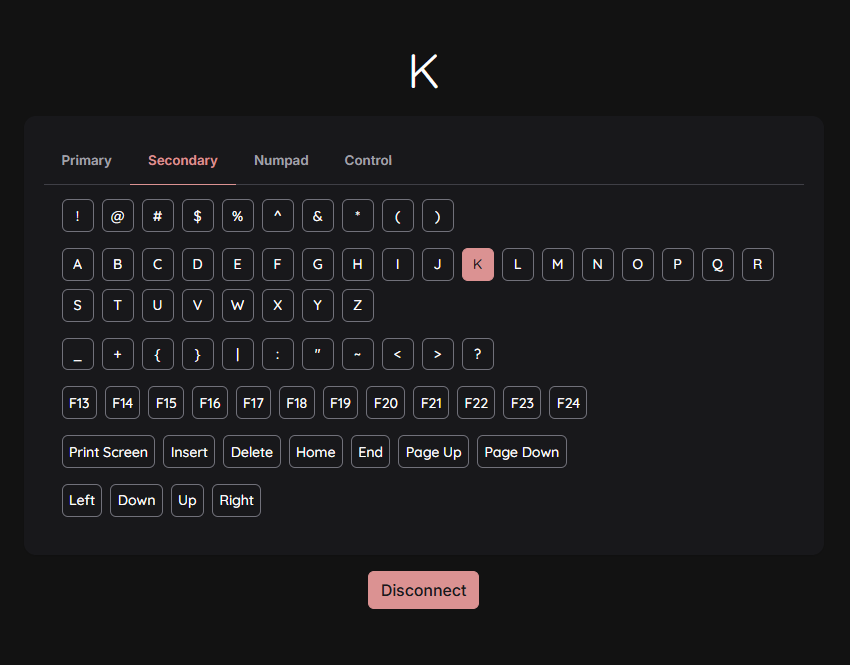
The selectable keys are broken up into four categories:
- Primary
- Lowercase characters, symbols, and other commonly used keys
- Secondary
- Uppercase characters, symbols, and other less commonly used keys
- Numpad
- Numpad keys
- Control
- Miscellaneous keys, typically associated with media control
Once a key is selected, it is immediately written to the MONOKEY, so no additional step is required.
After the desired key is programmed, click "Disconnect" to restart the MONOKEY.
Reverting to stock firmware
If a MONOKEY has been programmed with alternative firmware, FlashStation can be used to restore the stock firmware. Simply follow the steps listed in Connecting to FlashStation to connect, and follow the instructions to flash the device.
Troubleshooting
- If connectivity to MONOKEY is lost, or if the page becomes unresponsive, toggle the radio switch (OFF and ON), refresh the page, and try again.
- Currently, the sleep function of the MONOKEY will sometimes cause the MONOKEY to disconnect. This will be fixed in a future firmware update.
FlashStation Improvements
As of this time, remapping is limited to a single key, but we have plans to expand FlashStation’s functionality and MONOKEY’s firmware with the following feature roadmap:
- Single Key Remapping – Remap the hardware keycode to a single key
- ETA Feb 2025 - now BETA**
- Key Sequence Mapping – Assign a sequence of keys to a single MONOKEY press
- ETA April 2025
- Mouse Sequence Mapping – Assign a series of mouse actions to a single MONOKEY press
- ETA June 2025
 Third-party Key Mapping
For advanced customization, third-party key mapping applications can assign a MONOKEY keystroke to specific actions or macros. The availability of these applications varies by platform. Below are the options we have tested and recommend for use with MONOKEY.
Android: Key Mapper (by sds100)
- Assign keycodes to various actions, including media controls, app launches, navigation, connectivity, phone functions, and more.
- Supports key combinations and differentiates between short press, long press, and double press actions.
- No scripting required—features an intuitive, user-friendly interface.
Windows: AutoHotkey
- Bind keys to scripts for automation, from simple shortcuts to complex workflows.
- Beginner-friendly syntax with deep customization options for advanced users.
- Access a large community and a library of pre-written scripts.
- Open-source, lightweight, and highly efficient for system-wide key remapping.
We are actively exploring additional third-party key mapping options, particularly for macOS and iOS. If you have any recommendations, please share your suggestions with us on our community Discord.
 Virtual keyboard
By default, when a Bluetooth keyboard is connected, some operating systems are configured to automatically hide the virtual keyboard. If your virtual keyboard does not appear when MONOKEY is connected, here’s how to enable it on Android and iOS.
For Android
Method 1: Using System Settings
- Go to Settings → System → Languages & input (or search for "Virtual keyboard").
- Tap "On-screen keyboard" or "Virtual keyboard".
- Select "Manage on-screen keyboard".
- Toggle "Show virtual keyboard" (or "Use on-screen keyboard when a physical keyboard is available") ON.
- Now, the on-screen keyboard will appear even when a Bluetooth keyboard is connected.
Method 2: Using the Keyboard Icon in the Navigation Bar
- When a text field is selected, look for a small keyboard icon in the navigation bar (usually at the bottom right).
- Tap the keyboard icon to manually show the virtual keyboard.
Method 3: Using Developer Options (If No Setting Exists)
- Enable Developer Options (Go to Settings → About phone → Tap "Build number" 7 times).
- Open Developer Options and look for "Show Bluetooth keyboard" or "Force virtual keyboard".
- Enable this option to force the on-screen keyboard to appear.
For iOS
Method 1: Using iOS Settings
- Go to Settings → General → Keyboard.
- Scroll down to "Hardware Keyboard".
- Toggle "Show Onscreen Keyboard" ON.
- Now, the on-screen keyboard will be available even when a Bluetooth keyboard is connected.
Method 2: Using the Keyboard Button (Temporary Toggle)
- While the Bluetooth keyboard is connected, tap a text field.
- Look for a small keyboard button (⌨) at the bottom right of the screen.
- Tap it to show or hide the on-screen keyboard.
 Programming - Custom Firmware
Each MONOKEY is powered by a XIAO ESP32C6 -- a compact, high-performance IoT development board powered by the ESP32-C6 SoC, featuring dual 32-bit RISC-V processors (up to 160 MHz for high performance, 20 MHz for low power). It includes 512KB SRAM and 4MB Flash, supporting Wi-Fi 6 (2.4GHz), Bluetooth 5.3, Zigbee, and Thread (802.15.4).
This section explains how to repurpose your MONOKEY and reprogram your XIAO for your own projects.
Getting started - Arduino
The Seeed Studio XIAO ESP32C6 Getting Started Guide provides an introduction to the XIAO ESP32C6 microcontroller, covering its key features, specifications, and setup process. It includes:
Hardware Overview – Details on the ESP32C6 chip, GPIO pins, and connectivity options (Wi-Fi 6, Bluetooth 5, and Thread).
Setup Instructions – Step-by-step guidance on installing drivers, setting up the Arduino IDE or PlatformIO, and flashing firmware.
Example Projects – Sample code for basic functions like blinking an LED and connecting to Wi-Fi.
Resources & Troubleshooting – Links to datasheets, schematics, and common issue resolutions.
This guide is ideal for beginners looking to start development with the XIAO ESP32C6.
Here is a quick pinout diagram of the XIAO ESP32C6 for reference:
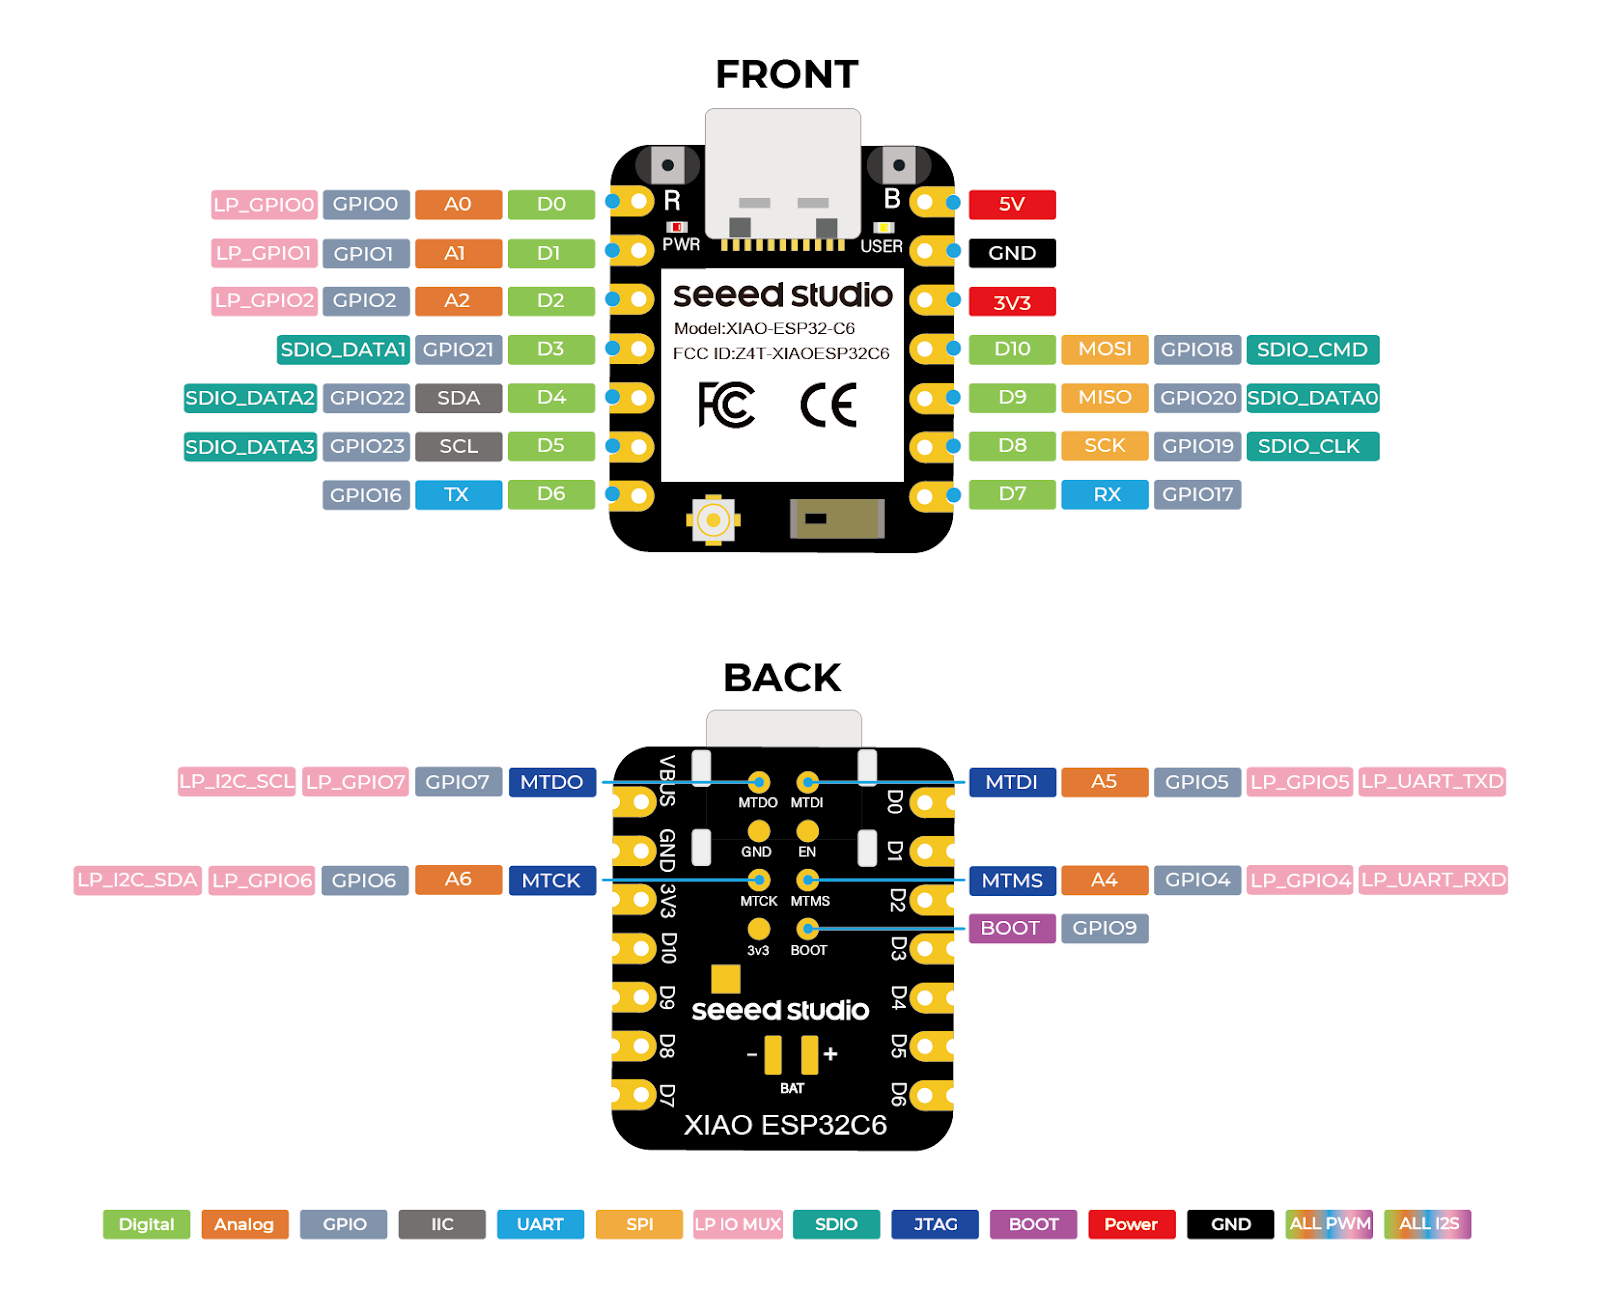
The ESP32-C6 datasheet contains detailed technical specifications on the SoC itself. It provides detailed information on the chip’s capabilities, and available peripherals.
Some peripheral pins are mentioned in the datasheet but not labeled in the Seeed Getting Started Guide. This is because the Seeed guide is designed to be more beginner-friendly, while the datasheet provides more advanced technical details of the ESP32C6 SoC.
Advanced - ESP-IDF
Arduino simplifies programming the ESP32C6 by offering an IDE and a wide range of high-level libraries (WiFi, Bluetooth, HTTP, etc.). However, the Arduino core abstracts many low-level features, which can result in less efficient code compared to native ESP-IDF development. Some advanced functionalities, such as FreeRTOS optimizations, and sleep capabilities are more accessible through ESP-IDF.
ESP-IDF (Espressif IoT Development Framework) is the official development framework for programming the ESP32C6. It provides low-level access to hardware, allowing developers to build efficient, optimized applications with full control over the microcontroller’s features.
Espressif’s official ESP-IDF getting started guide for the ESP32C6 provides step-by-step instructions on installing the necessary toolchain, build tools, and the ESP-IDF framework itself. This guide also walks users through configuring their first project, building the firmware, and flashing it onto an ESP32-C6 board without using the Arduino environment.
MONOKEY Specifics
The following is the hardware schematic of MONOKEY:

The following is a table of how MONOKEY peripherals are connected to the ESP32C6:
| MONOKEY peripheral | ESP32C6 pin | XIAO pin/pad |
| Key switch | LP_GPIO2 | Pin 3 |
| Radio switch | CHIP_PU | EN pad |
| Crystal oscillator | XTAL_32K_N | Pin 2 |
| Battery sense | MTMS | MTMS pad |
| 3.3v Battery | -- | BAT+/- pads |
Flashing MONOKEY
To flash firmware on MONOKEY, follow this sequence: plug the USB-C cable into your computer, flip the radio switch to off, then back on, and upload the firmware within 30 seconds (after which the monokey will sleep and prevent upload). Alternatively, hold the key switch down during the firmware update to prevent MONOKEY from sleeping.
A future firmware update will eliminate this step.
 Contact
- Discord: https://discord.gg/S4Qqz2ZqWm
- Email: bigbadcult@gmail.com